I cut my power adapter apart in a brutal way, but everything looked nice inside. I tested all the capacitors with my multimeter and again everything was fine. I even dropped it on a concrete porch which we call "hit repair" in Ukraine :)
I ordered a replacement power adapter on eBay, but it didn't help a bit. All the symptoms remained almost the same. This is when I found lots of different forum posts and product reviews on Amazon/eBay where people were complaining that the new power supplies didn't fix their problem. Most interestingly, the number of complaints for the original hp chargers was no less than for the cheap alternatives.
Finally, I decided to disassemble my laptop to check the jack. I found very nice disassembly manual here, which helped me to get to the jack pretty fast:
 | |
| The jack with the built-in LED |
I disassembled the jack itself to see if anything were loose inside:
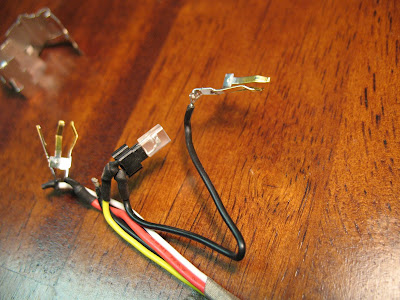
It turned out that HP didn't bother soldering all the metal leads to the wires which means that you get a 50% less reliable connection.
 |
| This whole part wasn't connected to anything! |
 |
| Short piece of black wire provides the ground for LED |
Now, the root of my problem:
 |
| The negative wire from the motherboard doesn't even touch the lead |
This has explained all the strange behavior of the laptop. While the negative LED wire was still soldered to the lead, the negative wire from the motherboard broke off of this same lead and was just merely touching it. I decided to solder the wires back to all the leads available to increase reliability:
(UPDATE: some of you were asking me how to figure out which wires go to which leads in the case you have many broken wires, so I'll try to explain how to connect them back.
You should have six wire ends on the jack side and four on the motherboard side. The reason for that is two black ends are from a short piece of wire connecting negative LED lead to a negative jack lead (you can see it on the 5th from the top picture that I recently added). Now look at the 3rd from the top picture. You should have yellow (left) and black (right) wires connected to LED (very top of the jack). Make sure to check that you connect short black wire to LED, and not the one that goes to the motherboard (you might need to unwrap the tape a bit to the point where the short wire loops back to identify it). The remaining two black ends must be connected to a negative lead. Negative leads connect to the outer ring of the plug. There are two of them, and one is unused (as I mentioned above), it's the top left lead with the round hole that you can see on the same 3rd from the top picture, you can solder your two black wires there, or you can use the one that's symmetrically located on the right side to which the black wires were originally soldered at the factory, or both for reliability.
Red wire can be soldered to another unused lead, the one with the round hole in the middle of the jack on the picture, or the original lead to the bottom-right of the unused one. These two leads connect to the inner ring of the plug.
Finally, white wire should be soldered to a lead located in the bottom-left area of the jack. This connects to the center pin of the plug.
If you don't want to mess with soldering, you might consider ordering the whole assembly jack+cable from a place like eBay.)
Moreover, I took the opportunity to clean the heat sink (I circled the area where it's not cleaned yet):
Having cleaned the heat sink dramatically decreased the heat from the laptop and the noise from the cooler. In fact, it looks like it wasn't functioning at all before cleaning.
Overall, my laptop is working again without any power related problems. I saved on a new jack, and, what's funny, my original power supply survived all the tortures to which it was subjected!


